The XcodeGhost virus incident happened last month which make Apple fans worry about their personal information safety. In fact, as long as we take good care of personal Apple ID and open the two-step verification for Apple ID, you can greatly ensure the information safety. Here we will give the following detailed tutorial about how to set up two step verification for Apple ID.
What is Two Step Verification?
The two step verification is an additional security feature for Apple ID, and it is designed to prevent anyone to access or use your account, even though they know your password.
It needs you to use a device or other approved methods to verify your identity before you can do the following:
Sign in to My Apple ID
to manage your account
Sign in to iCloud on a new device or at iCloud.com
Sign in to iMessage or FaceTime
Shop at iTunes, iBooks, or App Store on a new device
Get Apple ID related support from Apple
How to Set up Two Step Verification for Apple ID
Go to "My Apple ID"
Select "Manage Your Apple ID" and then log in
Select "Password and Security", and then answer your security questions
Choose one trusted device by clicking on Add a phone number, entering your four-digit verification code and clicking “Verify”
Write down and/or print your Recovery Key and click on Continue
Click on the checkbox if you agree to the conditions and click on Enable two-step Verification
After the device authentication is successful, we will get a very important Recovery Key. You had better keep in in mind or on somewhere and make sure you won’t forget it. And then, the system will ask you to enter the recovery key to confirm that you already have the key.
Note: After the completion of this step, we will open the two-step certification successfully. Well, how should you use it this two-step Verification? After opening two-step Verification, we need to enter a verification code to iCloud and other operations. And if you want to modify the Apple ID password, you need to enter the recovery key first.
The two step verification is an additional security feature for Apple ID, but you still need to set a safe password for your Apple ID, and make sure your private data won’t let out. If you are afraid of losing any data on iPhone/iPad/iPod, you had better use FonePaw iOS Transfer to safely backup iPhone with a few clicks.
Sunday, October 11, 2015
Thursday, September 24, 2015
Apple Releases iOS 9.0.1 with Fixes for Some Bugs
On Wednesday morning, Apple has released iOS 9.0.1 to iOS users, which fixes some bugs on the alarm clock, timer, Safari and cellular data. The update is available as a way of OTA download, of course as well as through iTunes.
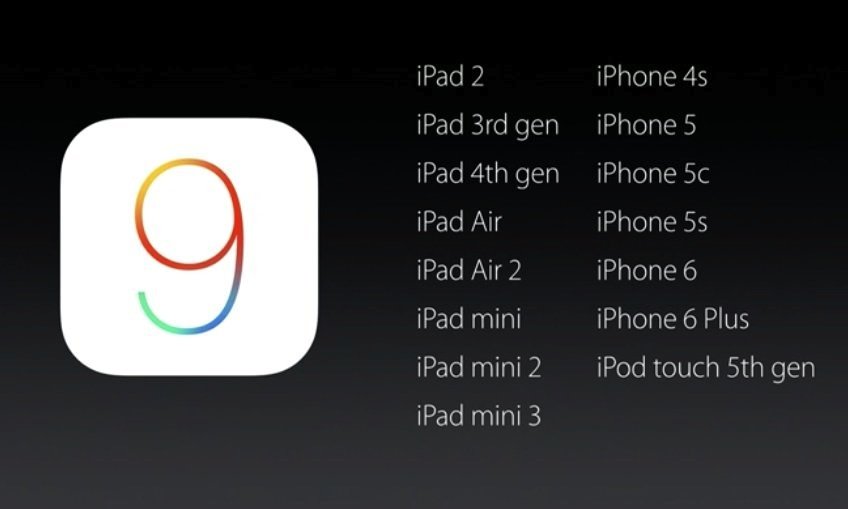
Apple released iOS 9 to the public on 17th September, and it’s available for all users who have an iPhone 4s or later, iPad 2 or later, 5th-generation iPod touch or later or any iPad mini to download the latest update. As expected, iOS 9 covers almost 50% among iOS users, which has become the fastest universal platform in the history.
But a large number of Apple users said that their iPhone system crashed when it upgraded iOS 9 or other issues appeared.
So the new iOS 9.0.1 brings some of the fixes include:
Fixes an issue where some users could not complete setup assistant after updating
Fixes an issue where sometimes alarms and timers could fail to play
Fixes an issue in Safari and Photos where pausing video could cause the paused frame to appear distorted
Fixes an issue where some users with a custom APN setup via a profile would lose cellular data
At the same time, Apple also began to provide developers with a second edition of iOS 9.1 beta system. Typically, that means it won't be long before iOS 9.1 becoming a public beta version.
Important note: Make sure you have backed up iPhone, iPad and iPod touch with FonePaw iOS Transfer before upgrading to the latest system. Now many people have regretted that they didn’t do that after their iPhone stuck in update.
Friday, September 18, 2015
Upgrade to iOS 9 without Losing Any Data
Apple has released the official version iOS 9 at September 16. For most iOS users, it is a very troublesome thing to upgrade the system every time. You need to back up your data first, and then upgrade the system, finally restore data. It almost spends half a day to do that. And how to upgrade the system with the original data is a problem that we are most concerned about. Here we introduce a way to you to make your device upgraded to iOS 9 without losing data as well as backing up and restoring data.
Before you begin, we recommend FonePaw iOS Transfer to you to make a regular backup for important information such as photos, contacts and other information, which can prevent you from losing important information because of some unexpected issues. Every iOS users should cultivate the habit of backing up data from to time. You can see here: How to backup iPhone.
Only no jailbreak phone users can update iOS 9 system via the following two ways. And for the jailbreak phone users, we will recommend the original "Recovery" approach to upgrade system. But jailbreak iPhone users can still use FonePaw iOS Transfer to backup iPhone first.
Method 1: Upgrade iOS 9 with OTA
iPhone supports OTA upgrade, which means you can upgrade iOS 9 system without USB cable and computer. You can go to Settings > General > System Update. The advantage of this way is that you can be easy to upgrade system with a few clicks on iPhone. What’s more, you can continue to use the iPhone normally while the iPhone is downloading the upgrade package.
The way of OTA upgrade also has its shortcomings. It needs more capacity of space for iPhone because iPhone need to download the upgrade package which will take up the storage space. Maybe it will need additional 1GB- 1.9GB. Especially for 16GB users, each upgrade can be a quite painful thing. But 16GB can still use iPhone Transfer to transfer data to PC in order to space some storage from upgrade.
Method 2: Upgrade to iOS 9 with iTunes
Another method is to connect device with iTunes. And you need to upgrade the latest version of iTunes, then click on the top right corner of the "iPhone" to enter detailed preview screen. If you do not separately download firmware, you can simply click the "Update" button and the computer will download the firmware first, and then update the latest system from device.
Note: The jailbreak iPhone users need to select "Recovery" approach to upgrade system. This way will clear all of data on your device. So you must make a backup with FonePaw iOS Transfer in advance.
Wednesday, July 15, 2015
How to Turn on/off iPhone without Power Button
Power/lock button not working? Here I am going to introduce a tip to help you turn on and off iPhone, iPad, or iPod touch without the power button.
Fistly, set up Assistive Touch on iPhone:
That’s it!
Part 1: How to Turn on iPhone without Power Button
- Connect iPhone to USB cable;
- Press and hold the Home button;
- Plug the iPhone into computer, then the iPhone will automatically start.
Part 2: How to Turn off iPhone without Power Button
Fistly, set up Assistive Touch on iPhone:
- Go to Settings on iPhone;
- Tap General;
- Choose Accessibility;
- Turn on Assistive Touch;
Then:
- Tap Assistive icon, then you will see Device;
- Press and hold Lock Screen until the power off screen appears;
- Now you can slide to turn off iPhone.
That’s it!
Wednesday, April 22, 2015
How to Export Contacts from iCloud
Summary: After you export contacts from iCloud following this tutorial, the exported contacts will be saved as .vcf files, which will be successfully recognized and accepted in Windows, OS X, iOS, Android, and BlackBerry operating systems.
iCloud can keep your contacts in sync on all your iOS devices. Besides, it provides the option to export contacts directly from iCloud.com. It is extremely convenient for you if want a complete contact list, because you do not need to use your iDevices to access them. And you can back up or share your contacts with others when you successfully export all of them from iCloud.
The exported contacts - VCF file, which is the universal standard file type, can be imported or shared in many other applications or services like Gmail, Yahoo, and so on.
How to export iCloud contacts?
iCloud can keep your contacts in sync on all your iOS devices. Besides, it provides the option to export contacts directly from iCloud.com. It is extremely convenient for you if want a complete contact list, because you do not need to use your iDevices to access them. And you can back up or share your contacts with others when you successfully export all of them from iCloud.
The exported contacts - VCF file, which is the universal standard file type, can be imported or shared in many other applications or services like Gmail, Yahoo, and so on.
How to export iCloud contacts?
- Go to iCloud.com and log in your account by entering your Apple ID and password.
- Choose “Contacts”.
- Select all contacts (On Windows, click “Ctrl + A” and on Mac, click “Command + A”). Then, click “Export vCard…”.
Now you can have all your iCloud contacts on local computer. However, for those who didn’t enable iCloud, you can still transfer contacts from iPhone to computer. Try FonePaw iOS Transfer.
Wednesday, April 1, 2015
How to Transfer iPhone Voice Memos to Your Computer?
iPhone gets a lot of fans due to its powerful functions and awesome system. Now the number of iOS users is increasing. Do you know your iPhone at your finger's tips? Today I want to share with you a tip on how to transfer voice memos from iPhone to computer, which I believe that many users will have such doubt.
Here we go:
Step 1. Tap “Voice Memo” on your iPhone.
Step 2. Find the recording you want to export from iPhone. Here we choose “New Recording” as an example.
Step 3. Tap the share button.
Step 4. Choose “Mail”.
Step 5. Type the recipient and tap “Send”. Generally enter your email address.
Step 6. Log in your email account on computer and download your voice memos.
Note: If you want to transfer large voice memos from iPhone to computer, you may need this guide below.
Guide: How to Get Voice Memos off iPhone
Done! It is very simple to transfer your voice memos. If you have questions, please leave your comments.
Here we go:
Step 1. Tap “Voice Memo” on your iPhone.
Step 2. Find the recording you want to export from iPhone. Here we choose “New Recording” as an example.
Step 3. Tap the share button.
Step 4. Choose “Mail”.
Step 5. Type the recipient and tap “Send”. Generally enter your email address.
Step 6. Log in your email account on computer and download your voice memos.
Note: If you want to transfer large voice memos from iPhone to computer, you may need this guide below.
Guide: How to Get Voice Memos off iPhone
Done! It is very simple to transfer your voice memos. If you have questions, please leave your comments.
Tuesday, March 10, 2015
Not enough storage on iPhone to take photos? Here's how to fix it!
After using the iPhone for some time, you
will find the iPhone's lack of space. In this article I will show you a
contingency approach, although this is not a permanent solution, it can meet
your urgent needs. The better way is when you are free, spend some time sorting
and backing up your photos.
There is a pop-up message “Cannot Take
Photo. There is not enough available storage to take a photo. You can manage
your storage in Settings” when you try to shoot some photos. What can you do?
Though you can’t take photos with the built-in Camera app, you can use “Messages”
to save photos.
- Tap “Messages”.
- Randomly pick a conversation.
- Tap the camera icon in the lower left corner.
- Choose “Take Photo or Video”.
- Take a photo and then tap “Use Photo”. Here you can see the photo you just shot appears on the edit box. Delete it and go to Photos, you can see the photo you took already exists.
But again, the above method is not a
long-term solution, you’d better get rid of those photos that you don’t need
and you can transfer
photos from iPhone to computer to keep them.
Subscribe to:
Posts (Atom)