Wednesday, April 22, 2015

How to Export Contacts from iCloud

Summary: After you export contacts from iCloud following this tutorial, the exported contacts will be saved as .vcf files, which will be successfully recognized and accepted in Windows, OS X, iOS, Android, and BlackBerry operating systems.

iCloud can keep your contacts in sync on all your iOS devices. Besides, it provides the option to export contacts directly from iCloud.com. It is extremely convenient for you if want a complete contact list, because you do not need to use your iDevices to access them. And you can back up or share your contacts with others when you successfully export all of them from iCloud.


The exported contacts - VCF file, which is the universal standard file type, can be imported or shared in many other applications or services like Gmail, Yahoo, and so on.


How to export iCloud contacts?


  1. Go to iCloud.com and log in your account by entering your Apple ID and password.
  2. Choose “Contacts”.
  3. Select all contacts (On Windows, click “Ctrl + A” and on Mac, click “Command + A”). Then, click “Export vCard…”.


Now you can have all your iCloud contacts on local computer. However, for those who didn’t enable iCloud, you can still transfer contacts from iPhone to computer. Try FonePaw iOS Transfer.

Wednesday, April 1, 2015

How to Transfer iPhone Voice Memos to Your Computer?

iPhone gets a lot of fans due to its powerful functions and awesome system. Now the number of iOS users is increasing. Do you know your iPhone at your finger's tips? Today I want to share with you a tip on how to transfer voice memos from iPhone to computer, which I believe that many users will have such doubt.

Here we go:


Step 1. Tap “Voice Memo” on your iPhone.


Step 2. Find the recording you want to export from iPhone. Here we choose “New Recording” as an example.

Step 3. Tap the share button.


Step 4. Choose “Mail”.


Step 5. Type the recipient and tap “Send”. Generally enter your email address.


Step 6. Log in your email account on computer and download your voice memos.

Note: If you want to transfer large voice memos from iPhone to computer, you may need this guide below.

Guide: How to Get Voice Memos off iPhone

Done! It is very simple to transfer your voice memos. If you have questions, please leave your comments.

Tuesday, March 10, 2015

Not enough storage on iPhone to take photos? Here's how to fix it!

After using the iPhone for some time, you will find the iPhone's lack of space. In this article I will show you a contingency approach, although this is not a permanent solution, it can meet your urgent needs. The better way is when you are free, spend some time sorting and backing up your photos.

There is a pop-up message “Cannot Take Photo. There is not enough available storage to take a photo. You can manage your storage in Settings” when you try to shoot some photos. What can you do? Though you can’t take photos with the built-in Camera app, you can use “Messages” to save photos.


  • Tap “Messages”.
  • Randomly pick a conversation.


  • Tap the camera icon in the lower left corner.
  • Choose “Take Photo or Video”.


  • Take a photo and then tap “Use Photo”. Here you can see the photo you just shot appears on the edit box. Delete it and go to Photos, you can see the photo you took already exists.


But again, the above method is not a long-term solution, you’d better get rid of those photos that you don’t need and you can transfer photos from iPhone to computer to keep them. 


Thursday, February 26, 2015

What is AirDrop and how to use it?

What is it?

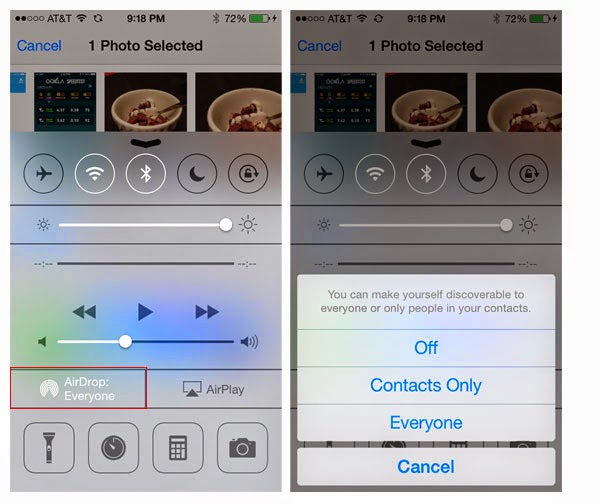
AirDrop is a new function of iOS 7, which can transfer files between iOS devices. However, it should be noted that not all iOS devices can use this function. At present, AirDrop is provided only on iPhone 5/6/6 Plus, iPad 4, iPad mini, iPad Air and iPod Touch5 using iCloud account. In other words, iPhone 4s and its contemporary products don’t support AirDrop.

How to turn it on?

You only need to slide your device from bottom to top to get the menu. And then, you can find AirDrop from Control Center and turn it on. You can also choose “contacts only” or “Everyone” to make yourself discoverable.

If you choose “Contacts Only”, only the contacts in your address book can share your photos, videos, contacts and so on. Airdrop uses wireless network and Bluetooth share files and it can ensure the safety of your shared content without any setup.

How it works?

After tuning on AirDrop, go to photos, contacts, etc., and click the share button, then the system will begin to search the user who have turned on AirDrop nearby and choose the targeted people. It can transfer data at a rapid speed after matching.


When the transfer is finished, these data will be put in the proper place according to their different file types. For example, photos will be stored in “Photos”, while retail coupons, movie tickets, loyalty cards, etc. will be put in “Passbook” and the contacts will be put in “Contacts”, and the like.

Attentions:

1. Since the system will not turn off Wi-Fi and Bluetooth automatically when you turn off AirDrop, you need to turn off the relative buttons manually if you don’t need to use Bluetooth or Wi-Fi in order to ensure the endurance of your iDevice.

2. If you don’t have Wi-Fi, you can use other methods to transfer or share contents between iOS devices. For example, you can transfer contacts from iPhone to iPhone, transfer music from iPad to iPhone by using third party utility.

Wednesday, January 28, 2015

Use iTunes to Create Personalized iPhone Ringtones

We know that though there are a lot of built-in ringtones in iPhone, still many apple fans wonder how to create some personalized ringtones for their own phone. Some apple fans reflected that iPhone can optionally change ringtones only after jailbreaking their devices. However, such saying is not true. In fact, you can use iTunes to create ringtone and upload to device without jailbreaking your iPhone.

Now, let’s review the method of using iTunes to create personalized ringtones.

Firstly, run iTunes on computer, go to “File”, and click “Add Files to Library”, then add the music you want as your ringtone in pop-up window.
Secondly, you can see the music file has been added in your playlist. Right-click the song and click “Get Info”.


Thirdly, click “Options” in pop-up window, then enter the start and stop time of the song in the corresponding boxes. Click “OK”. (Make sure the duration of the song is 30 seconds.)


Fourthly, right-click on the song again, choose “Create AAC Version”.
Fifthly, after finishing ACC version, there will be a new file in same name of the song you want to create as a ringtone at music library, but it is the short time version you just set. Now right-click the short time version song, select “Show in Windows Explorer”. Then change the file’s suffix from “m4a”to “m4r”. Then double click the song, which will be added to iTunes’s library automatically.

Sixthly, connect the iPhone to the computer, locate your iPhone and click “Tones” at the left side bar, then tick ”Sync Tones” and click “apply” at the bottom to synchronize ringtones.

Note: You may see the pop-up window as follow. To avoid erase all your data, you should sync carefully or choose the way I introduce at the end of the article.


Finally, on your iPhone, go to "Settings" > “Sounds” > “Ringtone”, you can find your customized tones, which you can set it as you’re your ringtone.

Apart from iTunes, you can also use some iPhone manager. The process of creating ringtones is easier.

Guide: iPhone Ringtone Maker: How to Make Ringtones for iPhone


Wednesday, January 21, 2015

10 Hidden Tricks and Useful Features of iPhone 6

Actually there are lots of features in iPhone, but most of them have been hidden deeply which are not easy to find. Here I would like to share 20 iPhone hidden tricks and useful features to you.

1. Set a more complicated passcode, not just simple numbers
A.      Settings -> General -> Passcode
B.      Turn off simple passcode
C.      After setting passcode, the keyboard with alphabet and figures

2. Ask Siri to read email/message
Only turn on Siri and ask her to “Read my email” can hear the email sender, date and time, subject. And you can also demand her to “Read my latest email” and “Do I have email from [person]?

3. Check the sending time of SMS/iMessage
You can easily check the time by swiping your sent SMS frame left with fingers if you have upgraded to iOS 7 or later.
4.  Check flights over your head
It’s one of the hidden features in Siri to check the overhead flights. You just need to ask Siri “What flights are above me” or “Planes overhead”, then she can give you details which includes flight name, height and flight angle. (Tip: please be patient, because Siri needs 30 seconds to get details)

5. Shake-to-undo typing
How to undo the typing mistakes? The shake-to-undo feature is a really convenient feature to undo it with shaking the iPhone, but do remember to hold your iPhone firmly in hand. After shaking, the screen will pop up to undo or cancel. If you have deleted the typing but want it back, then you just need to shake the phone again to get the original typing.
6. Locking Caps on iPhone
Want to know how to type uppercase letters without continuous tap on Caps icon? Actually, you just need to double tap on Caps icon on the keyboard to lock the Caps.
Note: If the function doesn’t work, you can try this way: Settings -> General -> Keyboard “Enable Caps Lock”
7. Turn off In-App purchases function
It’s a convenience for people to use in-App purchase function, but there is a risk of spending money accidently if you give the iPhone to children, especially if you are addicted to Candy Crush. You can turn off the shopping function without spending money out of plan: Settings -> General -> Restrictions -> Turn off/Turn on in-App Purchases.

8. Press volume button or use the volume up or down buttons on your headphone to take photos
It’s awesome to avoid shaking to take clear photos.
9. Select different vibrate mode
You can select different vibrate mode for different people in your contacts so that you can recognize who contact you. For example, if you don’t want to answer boss calling, you can… But of course not, you have to accept the calling of boss.
10. Automatically stop music or sound
Do you have the hobbit to listen music when getting into bed for night? Here is a really functional feature for you to set a timer to help you shut down the music or sound. You can tap on Clock -> Timer -> When timer ends -> scroll down and tap Stop Playing.

Wednesday, January 14, 2015

How to Locate Lost/Stolen iPhone

Many people want to know how to locate their lost iPhone. Actually, iPhone with iOS 7 or iOS 8 is equipped with positioning function, that is, “Find My iPhone” in iCloud. However, it has some limitations. To locate your iPhone, you need to do two things. Firstly, make sure “Find My iPhone” has been enabled. Secondly, make sure your iPhone has connected to Internet. Here is an introduction of locating your lost/stolen iPhone via computer.

Step 1: If you lose your iPhone, or it was stolen, go to the homepage of iCloud (https://www.icloud.com/). Please note that you need to make sure you’ve enabled “Find My iPhone” before your iPhone is lost. Then login with the Apple ID used on your iPhone.


Step 2: After successfully logging in to iCloud, click “Find My iPhone” as shown in the picture.


Step 3: If your iPhone is power on and connected to internet, you can see the general position of your iPhone.

Step 4: When your iPhone is online for positioning, you can make it play sound, set lost mode, and erase iPhone.


Step 5: If your iPhone is power off or not connected to internet, it will display that iPhone is offline. If so, you can tick “inform when iPhone is online”, or you can set lost mode, or remove the data of iPhone.

Note: You are recommended to transfer files from iPhone to computer back them up regularly so that when you lose iPhone, you can recover iPhone data.

Guide:
How to Transfer Music from iPhone to Computer
How to Transfer Photos from iPhone to Computer
How to Transfer Contacts from iPhone to Computer